
Fill your GitHub activity heatmap with the image of your choice

Taking 12 months to upload a 52x7 pixel image, through thousands of git commits, ... that's completely reasonable right?


Taking 12 months to upload a 52x7 pixel image, through thousands of git commits, ... that's completely reasonable right?

The quest started on 15th March 2021 📜

And here we are 712 fake commits in:
We've just reached roughly the halfway point, with half of the letter 'M' visible. You can see the result for yourself on my GitHub Profile Page.

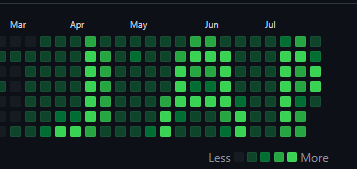
This is what the masterpeice will look like when complete, viewed using GitHub's light and dark themes:
It will then continue to repeat itself over time, like a really slow news reel.

I've really made the most of my degree.

I want! I want! I want!

I know you do. And you can have.

Its fairly simple to set this up on your own GitHub account. I made a GitHub repository containing all the code and instructions you need.

Basically, you just need to make your image (e.g. in MS paint):
Then create an empty private repository, which will get filled with fake commits. Also change some GitHub settings, and get an authentication token. Then change a little configuration file:
{
	"auth": {
		"type": "token",
		"token": "GITHUB_PERSONAL_ACCESS_TOKEN"
	},
	"repo_name": "REPO_NAME",
	"repo_owner": "REPO_OWNER",
	"image_file_name": "art.bmp",
	"start_date": "14032021",
	"test_mode": false
}
And finally setup a scheduled task to run a binary (Windows, Mac or Linux) on a computer which is always turned on at that time each day. Or run it yourself manually every single day if you are really desperate. For example, I use a server (an Azure cloud VM), which I always have running, and it's Linux, so I created a CRON job to run at 11:30pm every day. For Windows you can use the Windows Task Scheduler, or if you are super enthusiastic and like cloud stuff, setup an event-driven serverless function which gets triggered each day (e.g. Azure Functions).

Of course you then need to wait a year to see the results. Maybe try doing something useful in that time, ... or not.

All the files you need are on the GitHub releases page, and detailed instructions are in the repo's readme. The instructions and binary executable itself, are both very idiot-proof.

How it works

When the process runs on a particular day...
  1. It looks at your image, and finds the pixel it needs to upload that day
  2. It maps the colour of the pixel to the closest GitHub heatmap colours (one of 4 shades of green)
  3. From that it determines the amount of activity required to produce that colour on the heatmap
  4. Then it sends some requests to GitHub's Event API, to work out the amount of activity you have already performed that day
  5. Calculating the difference between the activity level needed, and the today's activity so far, it works out how many fake commits it needs to make
  6. Then it uses GitHub's API to push commits to the repository, each commit containing a small text file
  7. These commits count towards your GitHub activity, hence when someone views your profile, the commits that have been made each day, form pixels of the heatmap image
Warning: If you are a serious GitHub user, and you make lots of genuine commits/PRs/repos yourself, creating too much activity on a particular day may give a stronger shade of green on that day's pixel. You can't delete or undo activity, so if you are too active, it might ruin your heatmap image.

Btw, the code is open source and written in C# using .NET Core 3.1. You can build and compile it yourself if you want to make changes.

Have fun, I'll write another post in 6 months when the image has been fully uploaded 😎

Comments

Popular posts from this blog

Terminals in Sublime Text 3

TL;DR - Need a quick answer on how to create terminals in Sublime Text 3? Scroll down and watch the video or read the instructions below it. A while ago I started a series on YouTube of 'Sublime Text Tips'. Sublime Text 3 is one the best code editors currently in existence (fact), but most people just install it an use it without realising how it can be customized and extended to meet your needs. My aim was to release a series of videos explaining some of these widely unknown capabilities. I got as far as the third video and then got distracted with other things 😅 But recently I noticed the 3rd video I made has been increasing in popularity. For at least 6 months it sat at less than 200 views, and over the course of the last 2 months it has shot up to 850 (at the time of writing). Perhaps it's coincidence, or perhaps YouTube's algorithms have changed. Either way, there seem to be people who want this information. The video explains how to set up termin

Generating a MSI Installer for a WPF Application

This post serves as a tutorial for creating a MSI installer for your WPF Applications in Visual Studio. For this we use WiX (recommended by Microsoft). Prerequisites I assume you already have a Visual Studio solution containing a WPF Project. And I assume you have some experience with Visual Studio and XML. You do not need any prior knowledge of WiX. Step 1: Install Wix We are going to need WiX to generate our MSI. If you don't already have Wix installed, go ahead and download it from here . You'll be redirected to the relevant GitHub releases page where you can download the .exe file to install WiX.

Best Packages for Sublime Text 3 (Excluding Themes)

Sublime Text 3 is pretty good out-of-the-box but reaches a whole new level when you install some of the great packages on offer. Below I'll list my favourite packages for Sublime Text. These are all packages which will enhance your productivity across all languages, so no themes or language-specific packages will be listed here.